Overriding Swym Notification
NOTE: We are currently in the process of migrating to a new version of our platform (V3). To learn how to figure out which version you are on, click here. This article is on a feature that is currently only on the older version of our platform (V2) and will be made available soon for our V3 users.
Introduction
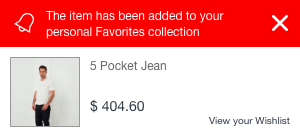
This post walks you through the steps required to create a custom notification flyout that comes after a product is added to wishlist, using Swym APIs. By default, the notification looks as below –

Note: Overriding Swym UI components is a part of the Swym UI APIs which are currently in beta. This solution requires the Swym v2 JavaScript package. To try it out, please contact our support team using the chat icon on the right and they would be happy to provide you beta access to the APIs.
Step 1
Write the custom notification markup. Each Swym UI element is a JSX component. JSX offers a simple way to write UI elements with an HTML-like syntax. Following is an example JSX component –
notification.js
function Notification(props, getHandler){
  var notifyJson = props.notification.notifyJson;
  return (
    <div id="notification">
      <h1 className="notification-title">Product added to your Wishlist!</h1>
      <h2 className="product-title">{notifyJson.dt}</h2>
      <img attrs={{src: notifyJson.iu}} />
      <div className="price">
        {(notifyJson.cu + " " + notifyJson.pr)}
      </div>
    </div>
  )
}
ShellCopy
With some minor differences, this is largely very similar to writing plain HTML markup. Each component receives a fixed set of data that it can use internally to render its contents. In this case, the notification component receives the following data inside the “notification” key –
show– true/ false boolean . Tells whether the notification should be shown or not. You can use this data to hide/show the notification with an animation for example.notifyJson– Data about the notification that needs to be shown.
Here is the data you will receive inside the notifyJson object –
{
  et: 4,                    // event type. 4 stands for added to wishlist
  empi: 606955339812,       // product master id
  epi: 7405017563172,       // product variant id
  dt: 'Paper Top',          // product title
  du: 'https://dundermifflininc.myshopify.com/products/paper',    // product url
  ct: '',
  pr: '2.00',               // product current price
  iu: '//cdn.shopify.com/s/files/1/0015/3809/7188/products/images_1.jpeg?v=1523103920',                         // product image url
  variants: '[{"Red / 200":7405017563172}]',
  uri: 'https://dundermifflininc.myshopify.com/products/paper',
  pt: 'Paper Top',
  hashtags: [                 // collections in which this product exists
    'World',
    'Hello'
  ],
  vinfo: 'Red / 200',        // variant info
  nt: 2,
  hdr: 'The item has been added to your personal Favorites collection',
  requiresProduct: true,
  cu: '$',
  addToCartCTA: 'Add To Cart',
  soldOutCTA: 'Sold out',
  notifyMeCTA: 'Notify me',
  unavailableCTA: 'Unavailable',
  addedCTA: 'Added',
  viewCartCTA: 'View Cart'
}
ShellCopy
Step 2
Once the markup is written, we need to compile down JSX into JavaScript that the browser can understand. To perform this step, here are the substeps involved –
- Go to this link – https://swymjsxcompiler.glitch.me/
- Put in your JSX markup for the component and hit Submit.
- Please copy the contents of the output received and take them to the Shopify theme editor.
Step 3
Now, we will override the compiled notification in the Shopify theme editor like shown below –
// your compiled JSX notification function code
function MyNotification(props, getHandler){
}

function swymCallbackFn(){
  SwymUiCore.registerComponent("Notification", MyNotification);     // overrides the default notification with your notification
}

if(!window.SwymCallbacks){
 window.SwymCallbacks = [];
}
window.SwymCallbacks.push(swymCallbackFn);
ShellCopy
All calls to the Swym APIs need to be wrapped in a SwymCallbacks construct like shown above because Swym loads asynchronously after the site content has loaded. The swymCallbackFn gets called once Swym has loaded. Inside that function, we are calling the registerComponent API that overrides the default component with your custom component.
That should do it! Refresh your site, add a product to wishlist and celebrate!
