")
Quick Start Guide with Wishlist Plus APIs for Shopify
Introduction
This quick start tutorial will show you how to use the Swym APIs to create a custom wishlist experience on your store from scratch.
Note: You will need Swym Wishlist Plus installed on your store to get the Swym APIs working for you. You will also need a basic familiarity with Shopify theme editor and Liquid to follow this guide.
Fundamentals
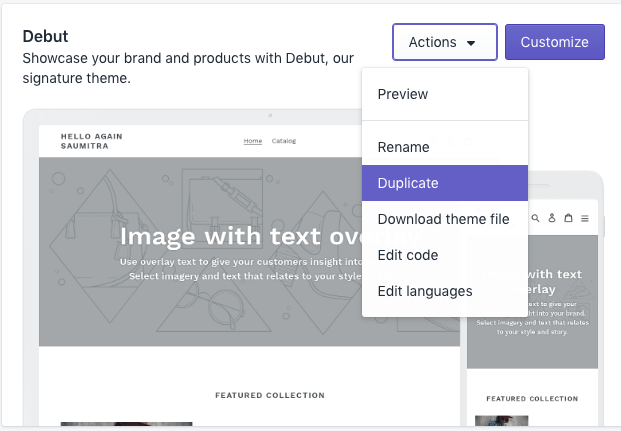
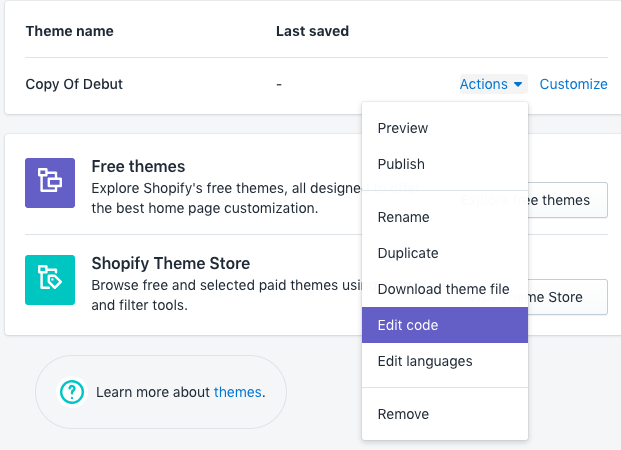
Let’s first create a dev theme where we can safely make changes and experiment. Please create a copy of your live theme if you don’t have a dev theme and open it up in Shopify’s Code Editor like shown below.
Once duplicate theme is in place, let’s create a new snippet to put our Swym JS API calls. I am going to name the new snippet “swymWishlist.liquid” and include this file at the end of the “theme.liquid” file like so –
{% include "swymWishlist" %}
With this step, we are ready to start adding code!
Custom button
Let’s create a custom wishlist button that blends well with the look and feel of the site. Using the Swym JS API, we can have complete control over the way it looks and the way it behaves. For our guide, let’s create a simple link-like button for our product page.
Create button markup
Let’s go into the product template and create the wishlist button markup. For the default Debut theme, this happens to be in the file “product-template.liquid”.
Here’s the button markup we need to add to the “product-template.liquid” and its associated CSS in the “theme.scss.liquid” file
product-template.liquid
<a href="#" class="wishlist-btn">Save for later</a>
theme.scss.liquid
.wishlist-btn {
  display: block;
  text-align: center;
  text-decoration: underline;
}
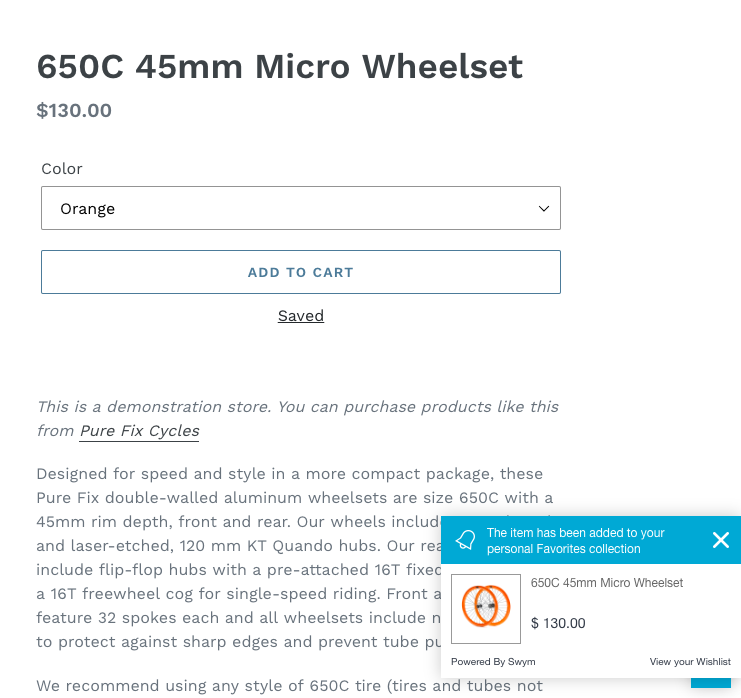
Here’s how the button will look like in the store. You can preview it by clicking the “preview” button on top and going to any product page.

Wire a click listener
Now that our button is ready, let’s wire a click listener to get it to respond to clicks. Here, we will use the Swym addToWishList API to add this product to Wishlist.
swymWishlist.liquid
<script>
  function swymCallbackFn(){
    var wishlistButton = document.querySelector(".wishlist-btn");
    if(wishlistButton){
      wishlistButton.addEventListener("click", function(e){
        if(SwymPageData){
         SwymPageData.et = 4;  // et 4 stands for wishlist event type
         _swat.addToWishList(SwymPageData, function(e){
            wishlistButton.innerHTML = "Saved";
          });
        }
      });
    }
  }
  if(!window.SwymCallbacks){
   window.SwymCallbacks = [];
  }
  window.SwymCallbacks.push(swymCallbackFn);
</script>
We used the “SwymPageData” object since that has all the data that the addToWishList API needs. This variable is populated by the “swymSnippet.liquid” file on product pages. In case you are using a custom storefront where Liquid isn’t used, or want to call the addToWishList API on a non-product page, please refer here for the arguments that need to be sent. But for now, this is all we need. Our wishlist button looks great and responds to a click action as shown below.
Finishing touches
If you refresh the page at this point, you will see that our wishlist button reverts to “Save for later” even though the product is in the wishlist. Enter the fetchWrtEventTypeET API.
The fetchWrtEventTypeET API returns all products of a particular event type. To show the correct button state, we will get all the wishlist products from this API and check if the current product is in that list. This will allow us to change the button behaviour depending on whether the product is in the wishlist or not.
swymWishlist.liquid
<script>
  var wishlistButton = document.querySelector(".wishlist-btn");

  function swymCallbackFn(){
    if(wishlistButton){
      _swat.fetchWrtEventTypeET(fetchCallbackFn, 4);
      // fetching all wishlist events
    }
  }

  function fetchCallbackFn(products){
    var activeProductId = SwymPageData.empi,
        activeVariantId = SwymPageData.epi;
    var isInWishlist = products.find(function(p){
      return p.empi == activeProductId && p.epi == activeVariantId;
    });
    if(isInWishlist){
      wishlistButton.setAttribute("disabled", true);
      wishlistButton.innerHTML = "Saved";
    } else {
      wishlistButton.addEventListener("click", function(e){
        if(SwymPageData){
          SwymPageData.et = 4;	// et 4 stands for wishlist event type
          _swat.addToWishList(SwymPageData, function(e){
            wishlistButton.innerHTML = "Saved";
          });
        }
      });
    }
  }
  if(!window.SwymCallbacks){
   window.SwymCallbacks = [];
  }
  window.SwymCallbacks.push(swymCallbackFn);
</script>
That’s it! You now have a fully functioning custom wishlist button that can blend seamlessly with the rest of your site. Check out our API documentation for full reference on APIs used here, more examples and API showcases.